Welcome here where you can discover my creations
Recent Articles
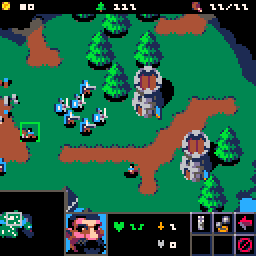
Picocraft is out on pico8 BBS!
It’s now been three years since I started working on this project, and I’m happy to finally share this first version of Picocraft! It’s a demake of Warcraft for the virtual console Pico-8, in other words, a vision of what Warcraft III might have looked like if it had been developed on 8/16-bit machines.
The idea comes from a fantastic mockup by Artem Brullov. The overall design is a mix of passion, nostalgia, and a reinterpretation of the original game.
read more
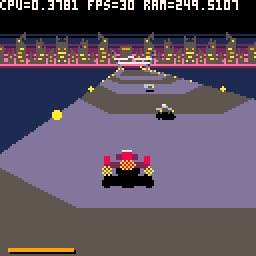
Brutal Pico Race, under the hood !
Brutal Pico Race uses an hybrid rendering system, combining differents technics for road an ships rendering. On the fly vertices computing and triangle rasterizer based on old school racing games for the road and voxel based ships.
Here is the first article about How I Make Brutal Pico Race. I try to give some technicals insight which are the result of a fight between a game idea and Pico 8 constraints.
read more
About
Welcome to the bowels of The Lurking Machine, a place where weird ideas never really sleep. I’m Damien Hostin (YouryKiKi), video game developer and amateur musician on a quest for strange sounds. Here, algorithms rumble in the shadows and melodies emerge from the depths, like glitches with a conscience of their own.
Imagine a mysterious machine whirring away in the dark, churning out code and music in joyous, controlled chaos.
read more